Thursday, 3 April 2025

Both sides of the hill: Beaune-la-Rolande (1870)

A seriously big battle is not necessarily the same thing as a seriously big game. After all, the whole point of BBB is to fit the biggest battles - Gettysburg, Solferino, Königgrätz and the like - onto a normal-sized table and into a single afternoon or evening session.

However, smaller battles still tend to produce smaller games. One particular advantage of these arises when they are small enough to swap sides and play the whole thing twice in a session from opposite viewpoints.

Such was the case last Monday, when Crispin rolled out his battlemat for Beaune-la-Rolande. This little skirmish involving fewer than 100,000 men was one of the first battles of the so-called 'republican phase' - the second half of the Franco-Prussian War, after Napoleon III was captured at Sedan. I remembered this being one of the first BBB scenarios Crispin wrote, but I was still taken aback when he said he created it ten years ago, in 2015. With four players (plus Dave W refereeing), we started setting up at 6:30, fought the battle twice, and were packed away by 9:30.

Here's a full photo-AAR of Game 1 in a dozen photos, then just a short verbal account of Game 2, then some Reflections.

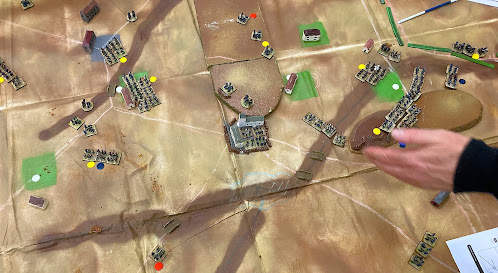
This is what the battle was about: the town of Beaune-la-Rolande in the centre of the German defensive line, which the Germans had fortified heavily. (Figures are Pendraken 10mm from Dave's collection. Buildings handmade by Crispin. All terrain provided by Crispin.)


The French have two corps of their newly-formed Army of the Loire. Here we see General Crouzat with the six brigades of his 20th Corps. The unit with the flag is one of only two decently trained formations on the French side (composed mainly of zouaves). The rest are either régiments de marche (hastily organized from depot battalions; figures in red kepis and pantalons) or garde mobile (poorly armed and barely trained levies - régiments de poubelle? figures all in blue).

The troops of the Prussian X Korps are twice as good but there are half as many, so it's a fair fight. Here we see Stülpnagel with the two brigades of his 5th Division, in greatcoats against the November weather, backed up by Hartmann's 1st Cavalry Division. Note that each unit includes a base of green-jacketed Jäger, indicating that it has the Skirmisher attribute.

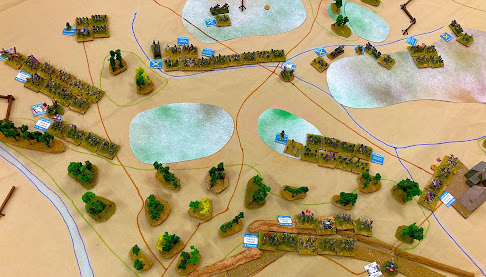
View of the whole bleak autumnal battlefield from the French side. Germans have deployed a brigade in Beaune-la-Rolande itself and two others on its left (upper right of pic), relying on 5th Div to arrive on the other wing. Green patches are villages, grey ones are towns. White counters indicate objectives. Beaune itself is worth two. The French need to take four to draw or five to win. Note that the Germans have adopted a forward position to contest Les Cotelles and Juranville (right centre of pic).


Close-up of the German centre and left, dug in with artillery support. Mark commanded this German wing.

I took Crouzat's 20th Corps on the French left. Crispin marched on with 18th Corps on the right. We agreed to attempt a double envelopment and win by isolating Beaune rather than storming it. Here's my left hook arriving on Turn 2. Red and yellow counters show my attempt at setting up a grand battery is already suffering from German counter-battery fire.

Better fortune on the right, where black 'Low Ammo' counters and vacated trenches show how effectively Bremond's 18th Corps has shaken out and blasted the German first line. Mark made a swift command decision to extract the survivors, concede the two forward villages, and fall back to hold Longcourt.

Back to me on the left wing. Next turn sees patient progress as my columns continue to march around the German right. Next stop; the objective village of Batilly, with La Pierre Percée just visible beyond it. No sign of German 5th Div yet.

Wide open spaces on our right wing as Crispin extends to envelop the German left, while the Germans reorganise their line. Our advance is slow because in this scenario (as in many FPW battles) the inexpert French army labours under the 'Passive' movement penalty.

On Turns 5 and 6, the action hots up on our left. The German cavalry has arrived and hastened across to reinforce Mark on the German left (out of shot right of pic). The two brigades of 5th Div have dashed forward to the town of Borville (grey patch) to try to retake La Pierre Percée from my zouaves (green village upper right). They've driven back one of my régiments de marche (yellow and blue indicates Disrupted and Spent) but are about to suffer an awful lot of incoming fire. Meanwhile, at top left, their newly-deployed gun line on the base line is taking flanking fire from some gardes mobiles.

Over on our right, the Germans have fallen back from Longcourt to rally around the central high ground above the Beaune bastion, relying on artillery to keep Crispin's French at bay. However, once Phil's counterattack at La Pierre Percée failed, Mark realised they needed to hold Longcourt or lose, so he pushed a brigade forward into it again. Crispin massed all he could and launched assaults from two directions on the last turn. Could victory be ours? Mark rolled his firing dice - and repelled both assaults. Foiled, we had to settle for a draw.

Situation at game end. Just three German infantry units remain: in the town of Borville (top left), in Beaune (centre) and clinging on against huge odds in Longcourt (upper right).

How the second game went

We swapped sides. Crispin and I also swapped wings. I took the German left, facing Mark, while Crispin commanded the German reinforcements on the right to fend off Phil.

We decided not to repeat the forward defence. Instead, we posted two brigades in and next to Longcourt, behind the reverse slope of the hills. However, we did mass 72 guns (3 artillery units) on the high ground on our extreme left, where they could pummel Mark's advance.

The French similarly decided to try a different plan, partly because of ours, but partly just for the sake of seeing how it worked out. They responded by sending only a couple of brigades (plus their small cavalry division) up their right-hand touchline, and a couple up the opposite side to face our reinforcements, while all the rest of their force converged to form a big arc focusing on Beaune-la-Rolande.

The French plan worked only in that their concentrated fire inflicted grievous casualties on the Beaune garrison. However, the French were unable to mount an assault to actually take the place. The German plan had worked better: our reverse slope force didn't need to fire a shot all battle; our Grossbatterie stalled the French right flank infiltration and then hurt their mass in the centre; then when 5th Division arrived it rolled up the lefthand end of the French arc around Beaune. The French only held one village at the end - an emphatic German win. 


Reflections

Two games in an evening = more than double the fun. There are those who like to savour a game over several sessions totalling 10, 15, 20 hours or more. I have happily acknowledged elsewhere that there is a particular pleasure to be had from the looong game. Nevertheless, the particular wargaming pleasure I mainly seek is that of making plans and high-level decisions and seeing how they work out. There are only so many such decisions to make in any given battle. If I can spend my 15 hours playing five games rather than one, that's a lot more big decisions, hence a lot more of that particular mental pleasure. This time we managed to fit two games into three hours and work through two alternative pairs of plans for the same battle. Not only did we have the direct pleasure from each game, there was also the pleasure of comparing the two - the whole was greater than the sum of the parts.

The other side of the hill. When I commanded the French left, I was very conscious of how brittle my army of Raw Fragile régiments de marche and garde mobile was: a single casualty would render a brigade Spent and largely combat-ineffective; those Krupp guns were very capable of inflicting such casualties; we had to cross a lot of open ground under their fire. The French task seemed very daunting (especially after failing at a similar task in a game of Coulmiers the week before). However, when I swapped my kepi for a pickelhaube, it didn't look any easier! Being outranged by twice our numbers of rifles wasn't a happy prospect, even with some entrenchments to hide in. Where to deploy was quite a tricky puzzle and we were fortunate it worked out so well. In short: it's a challenge for both sides, in very different ways - a tribute to Crispin's scenario design.

Fortifications in BBB. It seems too easy for an attacker to shoot defenders out of trenches. I'm not sure why it's taken me 10 years to reach this conclusion ... anyway, my thought is that a good house rule would be that units in fortifications can only be fired on a) by artillery, b) by units within 3", c) in Offensive Fire Phase if the target unit fired during the preceding Defensive Fire Phase, or d) in Defensive Fire Phase if the target unit declares it wants to fire in its Offensive Fire Phase. What do you think? (Maybe something for 2nd edition!) 😉.


The scenario is available from the BBB io group files here (you need to join the group to gain access).


Wednesday, 19 March 2025

My 2025 gamefest

I had a real treat earlier this month: a 10-day holiday in the US gaming it up with a great group of friends. Such a fantastic time, I'm going to record it briefly here, primarily for my own benefit, to look back on happily in years to come. If you enjoy it too, my gracious reader, all the better.

The trip kicked off with us visiting the Cold Wars wargames convention in Gettysburg:


Pretty busy and well attended, considering the con was planned relatively late. Some nice games on show and a chance to catch up with a few guys I'd not seen in a while.

We followed that up with a couple of hours touring some of the Gettysburg battlefield: Seminary Ridge, Little Round Top, the highwater mark. You can't beat walking the actual ground for understanding a battle.


Then it was back to SkirmishCampaigns HQ for a wonderful week+. Because we had the luxury of time, we paced ourselves sensibly. Most days we just played one high-quality game at a leisurely pace so we could appreciate it to the full. That would be followed by a civilised dinner (including Glenda's famous military history quiz one evening), then a drinks and a movie and more drinks (but not too many).

The roster of games played included:

- WWII: Peleliu. Pacific scenario by Rob, using the Arc of Fire 2 rules that he and Scott have been developing (with some input from me). We fought this twice (one Jap win, one US).

- AWI: Freeman's Farm. Scenario by Scott using his mods for battalion-scale BBB.

- AWI: Lexington & Concord. Scenario by Rob (adapted from CWG) using Scott's mods. We played this twice - both games were tied!

- AWI: Bunker Hill. Scenario by Rob. Fought this one three times, with a different British plan of attack each time and some tweaks along the way. One US victory, one draw, one British win.

- WWII air: "When Pigs Fly". Italians vs Brits over Egypt. Check Your Six! rules. Scenario from CB Stevens's Falcon of the Duce campaign scenario book.

- WWII: The Death of Wittmann. Scenario by Sean, written for Fireball Forward, adapted for AOF2. We played this three times with some tweaks. First time, the Brits sprang their ambush too early and got wiped out. Second time, the Germans walked clumsily into a better-timed ambush and got wiped out. Third time, Germans used sensible reconnaissance and were able to fight through for a win.

- ACW: The Seven Days. My BBB scenario. Initial Confederate attack was devastating, but Nick managed to rally the Union and hold the line.

20 or so photos of the action:

Rob's lovely layout for Peleliu.


Marines hit the beach at Peleliu. 15mm figures painted by Rob.

K Company takes on the Japanese first line of defence.

Magnificent centerpiece: the main Japanese bunker.

Luckily, the USMC has flamethrowers! (Unluckily, mine did virtually no damage all game.)

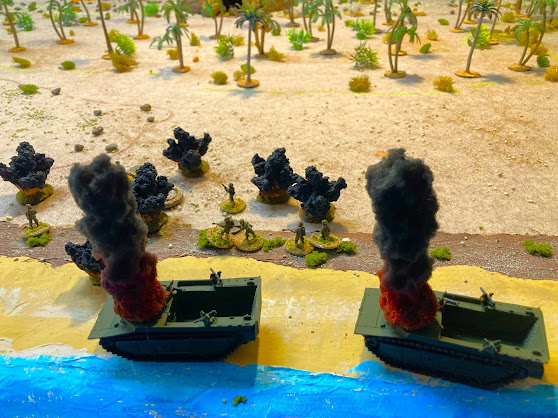
Amtraks come to grief, easy prey for 47mm.

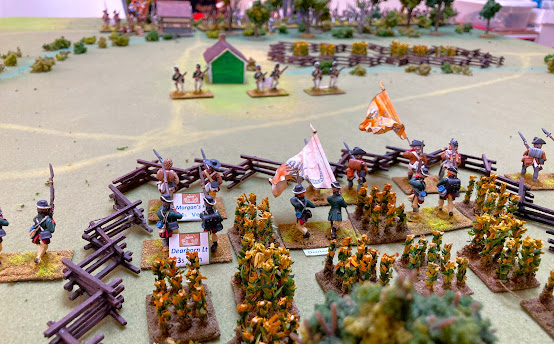
Morgan's Rifles at Freeman's Farm.

The Freeman's Farm battlefield.

Intense fighting at Freeman's Farm. Scott's 28mm figures.

British grenadiers at Freeman's Farm.

Bunker Hill. Terrain by Rob.

American militia await the British assault. Rob's 28mm figures.

The British are coming!

My layout for the Seven Days. This represents something like 15 miles x 10. Malvern Hill top left corner; Chickahominy river running through the middle. Confederates start from the top edge, with Jackson arriving from the righthand edge.

The Death of Wittmann: successful British ambush.

Not this time! The Panzerkeil escapes off the north board edge. Troops and terrain by Sean.

The Seven Days: Union line behind Beaver Dam Creek, in front of Gaines Mill.

Tough Union line in front of Fair Oaks.

Confederates approach, undaunted. Scott's 15mm figures.

Union right is driven back (top right), so McClellan counterattacks in the center directly towards Richmond (top left).

Game end: The Union holds the line north of White Oak Creek. Artillery protects the Glendale objective.

Impossible for these few words and pictures to convey just what a brilliant trip this was. Must do it again!


Changing history at 2nd Bull Run (1862)

Matt's current work-in-progress, both physically and intellectually, is the ACW Battle of 2nd Bull Run (aka 2nd Manassas). He rolled out his half-finished battlemat for us to playtest his scenario. Nick O and I took the part of the Rebs; Matt teamed up with Mark to save the Union.

The History: Having defeated McClellan on the Peninsula in his Seven Days campaign (which we played in January - report here), Lee launched his Confederate Army of Northern Virginia north towards Washington, hoping to destroy Pope's Union Army of Virginia before McClellan's redeployed Army of the Potomac could intervene.

Lee's Left Wing led the way, commanded by Jackson. On 28 August, Jackson set upon a US column at Brawner's Farm, just west of Groveton. This attracted the attention of Pope, who thought he had a chance to destroy Jackson's force, so launched a full attack on the 29th. In his strong position on Stony Ridge, with an unfinished railroad cutting providing an earthwork to cover his front, Jackson fended off Pope until the Right Wing under Longstreet arrived on his right around noon. Pope continued to launch a series of attacks on Jackson through the afternoon, all of which were repelled; his intended main blow by Porter against Jackson's right resulted only in an inconclusive clash with one of Longstreet's divisions. So ended the 29th.

On the 30th, having overestimated his success and Confederate losses, misinterpreted Confederate tactical withdrawals, and therefore underestimated Confederate strength and determination, Pope unwisely resolved to attack again. After a morning spent in reconnaissance and redeployment, around noon he attacked Jackson's right - effectively the Confederate centre - with his own left wing. This attack was bloodily repulsed. The Union army's left was then exposed to Longstreet's ensuing counterattack. As the Union forces reeled, Jackson too went on the attack. However, he was slow to do so, giving Pope enough time to form a line across Henry House Hill and cover an eventual orderly withdrawal.

Hmm, that was a longer exposition than I intended. To describe how the game went, let's plunge straight into the 10 captioned photos that illustrate it. (Some Reflections follow.)

My cameraphone doesn't do justice to Matt's artwork. What I'm trying to show you here is the striped trousers he's painted on these 6mm "Wheat's Tigers" Lousiana zouaves!

The battlefield. The mottled paper cutouts are hills, not woods. Woods are the green outlines with trees on them. (As I said, this is a work in progress. The finished product will look like the other lovely layouts on Matt's 'Pushing Tin' blog.) The big hill on the left is Stony Ridge, with the railway cutting in front of it. Groveton is the small town in the centre. US will deploy in the top half of the photo; Confederates in the bottom half. 

I commanded the Confederate left, shown here lining the railroad cutting. You can see I have already pushed two divisions forward into the woods on the left, seeking to hit the flank of the Union line top of pic. This is because my assessment of the situation was that, rather than waiting for the Union to make suicidal attacks, we Rebs needed to attack immediately to smash the outnumbered Union forces on-table initially before their substantial reinforcements could arrive to rescue them. Unfortunately, Mark had reached the same conclusion and took advantage of the very free deployment allowed by the scenario to form a solid defensive line near the back of the table to buy time. This entailed him sacrificing the Grovetown objective temporarily, but of course (a) he didn't need it to win and (b) there would be plenty of time to retake it once he had all his army available.


Meanwhile, on our right, Nick brought up most of Longstreet's corps. Nick doesn't play BBB very often, so didn't take full advantage of the roads and our advance here wasn't as swift as it might have been.

A couple of turns later on our left. I have pushed a third division forward but my left hook has been slow to emerge from the woods. Matt has responded by extending his right somewhat (top left of pic), while sending a couple of divisions of his own, including Berdan's sharpshooters, to test my position in the cutting. At least I have managed to seize Groveton (right edge) and flank them.

On the next turn, Matt tried to storm the cutting but was repulsed. I launched a counter-assault of my own to take advantage of his temporary discomfiture, plus two more assaults (finally) with Jackson's and Ewell's divisions top left. Matt blithely dismissed all these with firing rolls of 9, 10 and 11. Was that the highwater mark of the Confederacy for this game? Read on ...


Meanwhile, Mark chose to march up his reinforcements swiftly on the Union left, obliging JEB Stuart's cavalry to scamper back and aborting Nick's intended right hook. See the blue-labelled unit top left? That furthest-forward Union division presented Nick with an opportunity to isolate and smash it before its friends could help. He duly charged - and Mark duly rolled 11, managing not only to repel Nick's charge with heavy loss but also to leave the chargers hanging, awaiting the Union left's onslaught. The Union then wiped out one of Nick's divisions.

That pretty much sums up the action on Day 1 (29 Aug), apart from a couple more Union divisions showing up late in the day to seize Sudley's Ford on our extreme left and threaten Stony Ridge, where we deployed Anderson's division when it arrived during the ensuing night. 

Now we're about halfway through Day 2, still looking at the Confederate right. Nick managed to form a thin grey line in front of Stuart Hill (objective flag on bottom edge of pic), but he was facing a fat blue one that was getting round his right flank (see the bad guys in the woods upper right). He put up a valiant fight but by now the arithmetic was already inexorable. He was steadily driven back and back until Stuart Hill fell on the last turn.

We could still deny the Union victory if we held Groveton and took Henry Hill, in their right rear. We were in with a chance of doing so. How did that go?

Here's my own thin grey line in the centre of the battlefield around Groveton: good troops, in some cover, but too few of them. The diminished 3-base unit in the woods to the left of Groveton was overrun by two Union divisions upper left; our guns were driven off by fire; then the two divisions upper right stormed Groveton itself.

This is a view from a different angle, from the top of Henry House Hill. The main battle lines are off the lefthand edge. The three units top of pic are from Jackson's and Ewell's divisions, the troops I'd sent on my initial left hook. These had finally smashed the US right-flank guard division. The Henry House Hill objective lay before them, naked save for one battery that we could surely drive off with rifle fire. Onward!

Unfortunately, on the next US move, the three nearest US units all rolled the full-move results they needed to execute a smart about-face, cross the streams or woods in their way, and form up with the battery. My gallant men tried three times to storm the hill but the odds were too great. Maybe that was our highwater mark here. It was certainly every bit as bloody, desperate, and ultimately futile as Pickett's charge.

Happily, only little lead men perished (and will be resurrected on Sunday when we present Gettysburg at the Overlord show in Abingdon). Many thanks to Matt for creating the scenario and laying on the game; congratulations to him and Mark on a sound plan well executed and a deserved victory; and medal of honor to my comrade Nick for being indomitable in the face of adversity - I could see the writing on the wall and was ready to surrender by Turn 7, but Nick gamely said we should carry on for the full 10. Bravo!


Reflections

Players and Plans Matter. This was the third time Matt had run this scenario. He said the other games had produced crushing Confederate victories. His report on his previous playtest, with different players, is here. In that one, the US commander basically followed Pope's script, deploying forward and bashing his head repeatedly against the Confederate defences until he lost. In our game, Mark made no such mistake and had a much better plan, which worked. As for how it played out on-table, the mismatch of experience and expertise between Mark (our canniest player) and Nick (who only plays occasionally) didn't help the Confederate cause.

Victory Conditions Matter. This is a tricky battle to recreate, because it is difficult to replicate Pope's misapprehensions about his supposed numerical superiority and therefore to encourage the Union side to attack as they did historically. On the one hand, you don't want to force players to repeat dumb actions; on the other, if the Union can just sit back and wait to mass superior force, is it really Second Bull Run? Maybe we need to build in some incentive for the Union to try to hurt Jackson early on, be it objectives that only count on Day 1, or some more variability in Confederate deployment (maybe Longstreet gets to turn up at X distance from the Union, rather than having to arrive from the table edge?). This needs further thought.

Dice Matter. It's too easy to blame the dice when the truth is we were beaten primarily because of a good Union plan. I'm sure they evened out over the course of the game (I enjoyed an unlikely victory in Matt's first assault when I rolled a 6 to his 1; he did exactly the same to me later). But those four big US shooting rolls on Turn 3 or so absolutely stymied any initial advantage we had and had significant ramifications. Fortunes of war.

Player Morale. I don't care about winning - it's just losing I can't stand. I could see from quite early on that it was unlikely to go well for us; from halfway, it was obviously a case of fighting to salvage a draw, rather than any chance of victory; and a couple of turns later, I felt we were just going through the motions, performing the last rites. My morale definitely dipped and I was ready to throw in the towel. But even though Nick was in an even worse situation on his wing than I was on mine, he was determined to fight on, put up a spirited defence to the last, and almost managed to hang on. Never say die!

Wednesday, 26 February 2025

A Taiping battle: 2nd Hukou (1860)

A mere eight years ago, I invested in a four-volume work in Chinese: a military history of that immense yet unknown conflict, the Taiping Rebellion. (As I recorded at the time here.) Obviously I meant to generate scenarios from it, but competing priorities, lack of time, paucity of other sources, and especially the language obstacle meant this project has lain fallow ever since - until last year, when OWS made a new friend. Jeremy speaks Chinese and has studied this war seriously. He is back in Hong Kong now, has access to good Chinese sources, and has been working on BBB scenarios for it.

I was excited to see his first one arrive on our tabletop at OWS this week. Stalwart OWS member Bob Medcraft laid it on for us. Bob's garage is full of armies of all nations and eras, so it was no great problem for him to rustle up a battle's worth of 19th-century Chinese in 15mm scale. (Actually, that's not fair - although he had enough miscellaneous Oriental troops for the core of the two armies already, he did paint up dozens of extra figures specially. Some of these were figures he and some other gamers had got Steve Barber to sculpt as private commission a while ago.)

The scenario in question was for the Second Battle of Hukou (22 December 1860). This was a tricky one for Jeremy to reconstruct as he had to interpret and reconcile conflicting sources, as well as tracking down a good map. The strategic situation is that the Taipings were trying to capture the city of Wuchang, far up the Yangtze from their capital of Nanjing. To do so, they sent four widely separated columns to converge on it. One of these, some 30,000 men under Yang Fuqing, was to capture Hukou, secure water transport there, and then reach Wuchang by river. The Qing government forces defending Hukou had about 25,000 poor infantry in a stockaded defensive line east of Hukou, backed up by 15,000 or so cavalry, plus a small garrison in the town itself and adjacent fort. The stockade line had its right resting on a river and its left against a ridge of steep hills running alongside the Yangtze.

There were five victory locations: the three stockades; Hukou itself; and the village of Sanli, halfway between them. The Taipings could earn an Objective each for Hukou and Sanli; one more for taking any two of the three stockades; and another one if they held either Hukou or Sanli and the Qings failed to evacuate at least five infantry units up the Yangtze. They needed two Objectives to earn a draw or three to win.

Here's how our game of this unusual and exotic battle went.

Qing defenders of the northernmost stockade. Each stockade counted as a Town in BBB terms, capable of holding one infantry unit, and had two artillery units in front of it in 'Rifle Pits' (1 level of cover). The first line of Qing infantry was Raw and Passive - and these were their better troops. 15mm figures from Bob's collection, I think a mix of Khurasan, Steve Barber, maybe some Eureka.


View of the whole stockade line. Hukou is the sandy-coloured felt top right, beyond the wooded ridge. (Bob mostly plays competition games where a few bits of felt is sufficient terrain, so he forgot to bring any trees or buildings.) The second line of infantry is Peng Chunyao's Hunanese contingent - these were not only Raw and Passive but Fragile as well. Behind them is a mass of regular cavalry. All the Qings started the battle Disrupted because the Taipings attacked at dawn.

Pan out some more and we see the Taiping attackers arrayed. All the Taipings were rated Aggressive and at least Trained. Three infantry units were classed as Veteran 'Guards'. The little 2-base unit and artillery on the right centre hill, flanking the stockade line, was a force of 'picked men' that included a British sailor, Augustus Lindley, whose account is one of the sources Jeremy used.

Crispin and Phil commanded the Qings. Bob took the Taiping left, I had the centre, and Dave W our right. Our plan, such as it was, was for Bob to pin the Qings frontally while I rolled up the stockades from the right and Dave pushed through towards Sanli and Hukou.

A closer look at the Qings in the stockades. Even though Jeremy created a special weapon class, 'Chinese Artillery' (CA), with lower firepower than normal Western smoothbore cannon, that artillery proved formidable.

Our attack develops on the right. I get my two blue brigades onto the hill above the stockades' flank. The picked men and a supporting brigade rout a Qing effort at a spoiling counterattack and stand atop the ridge. However, this has left them Disrupted, Low on Ammo and exposed.

Crispin and Phil take due advantage. Dave's picked men are overrun by massed cavalry. However, my thin white line repels a Qing infantry brigade.

Freshly squeezed Mandarins! The Taipings' turn to attack again. As per the plan, we stormed the first stockade, routing some Qing brigades. The blue brigade is one of mine that exploited one victory and achieved a second. However, in retrospect, that may have been a mistake, as it was left exposed to a subsequent flank attack.
A couple of turns of see-saw counter-attack and counter-counter-attack ensued. The exposed brigade has fallen back Spent out of shot beyond lower left corner. We launched more attacks to try to take advantage of the Qing counter-attackers' Disruption. As their growing collection of blue 'Spent' counters shows, we smashed some back, but that left us Disrupted (yellow counters) and vulnerable in turn. In particular, that left-hand unit in green drove back its foes, only to unmask two batteries at cannister range. That didn't go well.

On our far right, one Taiping Guards unit approaches the fort by the Yangtze protecting Hukou. No further progress was possible here. Note the impeccably manicured fingers of the Qing mandarin. Long plaited moustache just out of shot.

I think we played seven turns out of 10. My blue brigade holds a stockade but Qing counter-attackers have advanced past its left. There are too many of them, and too few of us, for us to take any more of the stockade line. Our one glimmer of hope is the white-coated unit just visible top right. This (plus three other units behind it) would have had a good chance of taking the village of Sanli (sandy felt top right) and cutting the Qing evacuation route. If we'd had time to play the last couple of turns and managed to take and hold Sanli, it would have been a draw; otherwise, a Qing victory. 

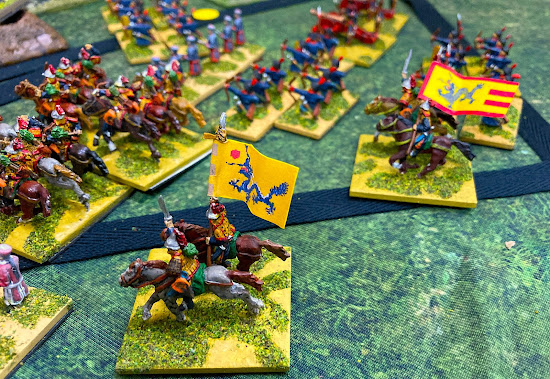
The victorious Qing commanders fly their banners proudly.

Reflections:

The virtues of 15mm. I know there are other players who use 15mm for BBB, but at OWS we almost always use 6mm or 10mm. It was a nice change to 'go large' and see individual soldiers more clearly. We had enough figures on the table for it to still look like a battle, not a skirmish. One minor disadvantage was that Bob's base frontages were larger than the standard BBB 1" (I guess 40mm), so initial deployments were slightly more cramped than the scenario envisaged, but otherwise it worked fine.

The exotic East. We all loved the fact that we were dipping our toes in the Yangtze and learning about the Taiping Rebellion. Fundamentally it's still just 19th-century horse and musket, of course. But Jeremy's addition of Chinese weapon types and his use of standard BBB attributes to rate the two very different armies' troops captured the different flavour of this war.

Terrain aesthetics. To capture it fully, we really needed pagodas in the town, Chinese buildings in the villages, and junks on the Yangtze. Not to mention some trees in the woods (couldn't see the trees for the woods? shouldn't it be the other way round?). Hopefully we'll be better equipped next time.

Complex situations make interesting scenarios. A simple assault on a stockade line wouldn't have been much fun. (See my essay on frontal assault games here.) The fact that we had a flank option, plus an evacuation route to threaten, gave both sides more choices to make, more scope for maneuver, and more interesting things to do.

Historical research. Huge kudos to Jeremy for his work in taking conflicting sources, making sense of them, tracking down necessary geographical and other details, and turning all this into a historically accurate and eminently playable scenario that brought some obscure and fascinating history to life for us players. This is what BBB is all about!